概述 在脚本语言和敏捷开发流行的当前,Java 开发显得很笨重,即便是在传统的 J2EE 开发中引入了 Spring,整合和配置的繁琐还是一直饱受诟病,为了解决这个问题,Spring Boot 应运而生。Spring Boot 并没有创造新的技术,它基于“习惯优于配置”,即内部有一套默认的配置,使你无需手动配置便可使用 Spring 平台的产品。
Spring Boot 有很多重要的特性,这里简单列举几个具有代表性的:
独立运行 内置 Servlet 容器 自动配置 无 xml 配置,无代码生成
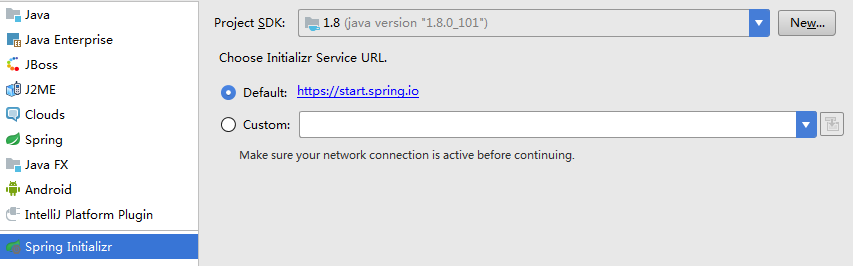
快速开始 如果使用 eclipse 等 IDE 可以安装 Spring Tool Suite 插件,这里使用 IDEA 作为 IDE。
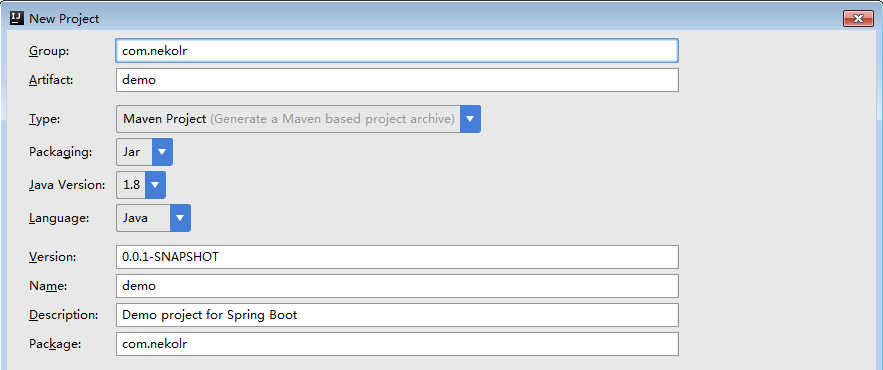
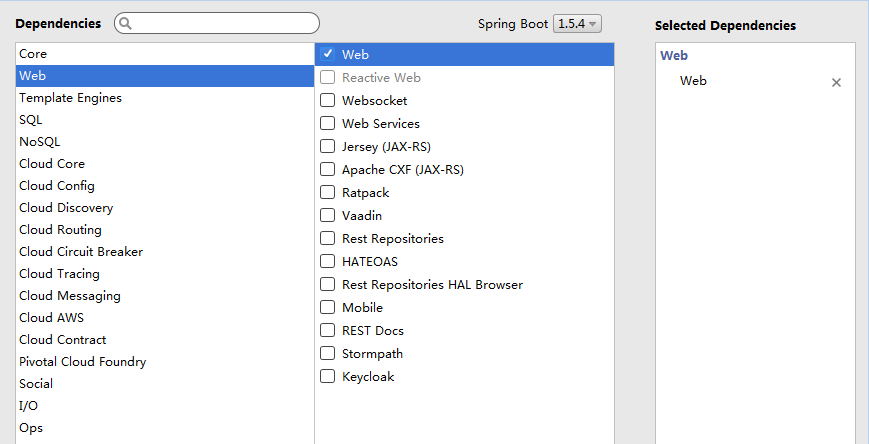
首先第一步是创建一个新项目,填写项目相关信息。
pom.xml 分析 1 2 3 4 5 6 7 8 9 10 11 12 13 14 15 16 17 18 19 20 21 22 23 24 25 26 27 28 29 30 31 32 33 34 35 36 37 38 39 40 41 42 43 44 45 46 47 <?xml version="1.0" encoding="UTF-8" ?> <project xmlns ="http://maven.apache.org/POM/4.0.0" xmlns:xsi ="http://www.w3.org/2001/XMLSchema-instance" xsi:schemaLocation ="http://maven.apache.org/POM/4.0.0 http://maven.apache.org/xsd/maven-4.0.0.xsd" > <modelVersion > 4.0.0</modelVersion > <parent > <groupId > org.springframework.boot</groupId > <artifactId > spring-boot-starter-parent</artifactId > <version > 1.5.20.RELEASE</version > <relativePath /> </parent > <groupId > com.nekolr</groupId > <artifactId > demo</artifactId > <version > 0.0.1-SNAPSHOT</version > <name > demo</name > <description > Demo project for Spring Boot</description > <properties > <java.version > 1.8</java.version > </properties > <dependencies > <dependency > <groupId > org.springframework.boot</groupId > <artifactId > spring-boot-starter-web</artifactId > </dependency > <dependency > <groupId > org.springframework.boot</groupId > <artifactId > spring-boot-starter-test</artifactId > <scope > test</scope > </dependency > </dependencies > <build > <plugins > <plugin > <groupId > org.springframework.boot</groupId > <artifactId > spring-boot-maven-plugin</artifactId > </plugin > </plugins > </build > </project >
分析 pom.xml,其中有一个父级依赖:spring-boot-starter-parent,它的父级依赖 spring-boot-dependencies 里定义了常用的 jar 包和版本,免去了配置依赖 jar 包。dependencies 中定义了 web 和 test 的 starter,这样就添加了 web 开发依赖和测试依赖。 spring-boot-maven-plugin 是 Spring Boot 的编译插件,用来将项目打包成一个可运行的 jar。
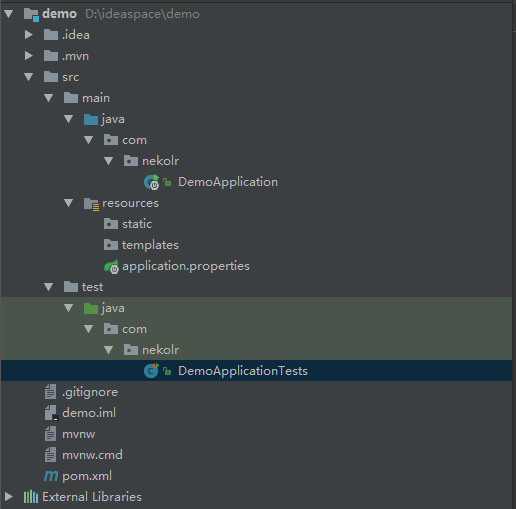
入口类分析 创建完成的 Spring Boot 项目通常会有一个名为 *Application 的入口类,入口类有个 Java 标准的 main 方法,在 main 方法中运行如 SpringApplication.run(DemoApplication.class, args) 的代码来启动项目。
入口类一般带有 @SpringBootApplication 注解,查看注解源:
1
2
3
4
5
6
7
8
9
10
11
12
13
14
15
16
17
18
19
20
21
22
23
24
25
26
27
28
29
30
31
32
33
34
35
36
37
38
39
40
@Target({ElementType.TYPE}) @Retention(RetentionPolicy.RUNTIME) @Documented @Inherited @SpringBootConfiguration @EnableAutoConfiguration @ComponentScan( excludeFilters = {@Filter( type = FilterType.CUSTOM, classes = {TypeExcludeFilter.class} ), @Filter( type = FilterType.CUSTOM, classes = {AutoConfigurationExcludeFilter.class} )} ) public @interface SpringBootApplication { @AliasFor( annotation = EnableAutoConfiguration.class, attribute = "exclude" ) Class<?>[] exclude() default {}; @AliasFor( annotation = EnableAutoConfiguration.class, attribute = "excludeName" ) String[] excludeName() default {}; @AliasFor( annotation = ComponentScan.class, attribute = "basePackages" ) String[] scanBasePackages() default {}; @AliasFor( annotation = ComponentScan.class, attribute = "basePackageClasses" ) Class<?>[] scanBasePackageClasses() default {}; }
@SpringBootApplication 是一个组合注解,它包含 @SpringBootConfiguration、@EnableAutoConfiguration 和 @ComponentScan 注解。spring-boot-starter-web 依赖,则会自动添加 tomcat 和 Spring MVC 依赖,同时自动配置 tomcat 和 Spring MVC。
使用 exclude 可以在扫描时过滤某些类,如 @SpringBootApplication(exclude=CacheAutoConfiguration.class)。Spring Boot 会自动扫描 @SpringBootApplication 所在类同级或下级包中的 Bean,因此入口类最好放在 groupId.artifactId 包下。
Banner 在 src/main/resources 下添加 banner.txt 文件,在 http://patorjk.com/software/taag 中选择 banner 样式并复制到 banner.txt 文件中。当然可以选择不显示 banner。
1
2
3
4
5
6
7
8
9
@SpringBootApplication public class DemoApplication { public static void main (String[] args) { SpringApplication app = new SpringApplication (DemoApplication.class); app.setBannerMode(Banner.Mode.OFF); app.run(args); } }
1
2
3
4
5
6
7
8
9
@SpringBootApplication public class DemoApplication { public static void main (String[] args) { new SpringApplicationBuilder (DemoApplication.class) .bannerMode(Banner.Mode.OFF) .run(args); } }
配置 POM 如果不想使用默认的 jar 版本,可以在 pom.xml 中使用 properties 添加版本以覆盖默认的版本。
1 2 3 <properties > <lombok.version > 1.16.18</lombok.version > </properties >
默认的 spring-boot-starter-parent 不一定适合所有的场景,可以使用自定义的父级依赖。如果不想使用默认的 spring-boot-starter-parent,又想使用默认的依赖管理,可以使用 import,并在 pom.xml 中如下配置:
1 2 3 4 5 6 7 8 9 10 11 12 <dependencyManagement > <dependencies > <dependency > <groupId > org.springframework.boot</groupId > <artifactId > spring-boot-dependencies</artifactId > <version > 1.5.20.RELEASE</version > <type > pom</type > <scope > import</scope > </dependency > </dependencies > </dependencyManagement >
上述配置不能通过 properties 修改默认的依赖版本,只能在 dependencyManagement 中指定版本。
1 2 3 4 5 6 7 8 9 10 11 12 13 14 15 16 17 <dependencyManagement > <dependencies > <dependency > <groupId > org.springframework.boot</groupId > <artifactId > spring-boot-dependencies</artifactId > <version > 1.5.20.RELEASE</version > <type > pom</type > <scope > import</scope > </dependency > <dependency > <groupId > org.projectlombok</groupId > <artifactId > lombok</artifactId > <version > 1.16.18</version > </dependency > </dependencies > </dependencyManagement >
Srping Boot 提供了很多起始依赖(starter pom),具体参考:spring boot starter pom 。同时可以选择不同的 Servlet 容器,如 spring-boot-starter-jetty 和 spring-boot-starter-undertow。
1 2 3 4 5 6 7 8 9 10 11 12 13 14 15 16 17 18 <dependencies > <dependency > <groupId > org.springframework.boot</groupId > <artifactId > spring-boot-starter-web</artifactId > <exclusions > <exclusion > <groupId > org.springframework.boot</groupId > <artifactId > spring-boot-starter-tomcat</artifactId > </exclusion > </exclusions > </dependency > <dependency > <groupId > org.springframework.boot</groupId > <artifactId > spring-boot-starter-jetty</artifactId > </dependency > </dependencies >
spring-boot-devtools 是为开发者提供的一个热部署工具,当我们修改了项目 classpath 下的文件时,Spring Boot 会重启应用,当然这个启动很快。原理就是使用了两个类加载器,一个为 base 类加载器,用来加载一般不会改变的类,如第三方 jar 包等;一个为 restart 类加载器,用来加载经常改变的类,如我们正在开发的类,应用重启时,原先的 restart 加载器被丢弃,重新创建 restart 加载器加载修改过的文件。 JRebel 或 Spring Loaded 。
1 2 3 4 5 6 7 <dependency > <groupId > org.springframework.boot</groupId > <artifactId > spring-boot-devtools</artifactId > <optional > true</optional > </dependency >
触发重启 只要 classpath 中的文件发生改变就会触发。在使用 IDE 时,如果是 eclipse,只需编辑后保存即可(eclipse 默认开启了 build automatically)。如果是 IDEA,一般情况下可能没有设置自动 build,此时需要手动 build 项目。
当然,某些文件的改变并不会重启应用,而是重新加载资源。查看 DevToolsProperties 类的源码会发现,默认不重启应用的目录和文件为:
META-INF/maven/**META-INF/resources/**resources/**static/**public/**templates/****/*Test.class**/*Tests.classgit.propertiesMETA-INF/build-info.properties
(其中 static、public、templates 都是 resources 下目录)。可以在全局配置文件中选择排除某些目录:
1 2 spring.devtools.restart.exclude =static/**,public/**
如果想保留默认配置并添加额外的排除配置,可以使用 spring.devtools.restart.additional-exclude。对于不在 classpath 下的文件,也可以使用 spring.devtools.restart.additional-paths 设置目录以监视其更改。
关闭热部署 1 2 spring.devtools.restart.enabled =false
1 2 3 4 5 6 7 public static void main (String[] args) { System.setProperty("spring.devtools.restart.enabled" , "false" ); new SpringApplicationBuilder (DemoApplication.class) .bannerMode(Banner.Mode.OFF) .run(args); }
设置触发文件 有的时候我们会频繁修改某些文件,我们希望能够在某个时机来重启。通过设置触发文件,在想要重启时,修改触发文件来达到触发重启的目的。
1 spring.devtools.restart.trigger-file =某个文件
Live Reload 插件 Devtools 内置了一个 Live Reload 服务,可以在资源发生改变时来刷新浏览器页面,这个功能需要配合 Live Reload ,也可以在 Chrome 应用商店中搜索 LiveReload 插件安装。
全局配置 在 Spring Boot 中,可以通过 properties 文件、YAML 文件、环境变量和命令行参数来设置参数,然后使用 @Value 注解从 Spring 的 Environment 获取参数值,也可以通过 @ConfigurationProperties 注解将值绑定到 Bean 上。
参数取值途径 以下配置覆盖的优先级顺序由高到低,高优先级的可以覆盖低优先级的形成互补。
当 devtools 激活时,全局配置 ~/.spring-boot-devtools.properties
@TestPropertySource 测试注解@SpringBootTest#properties 测试注解属性命令行参数
SPRING_APPLICATION_JSON 中的属性 $ SPRING_APPLICATION_JSON='{"foo":{"bar":"spam"}}' java -jar xxx.jar 设置)ServletConfig 初始化参数
ServletContext 初始化参数
java:comp/env 中的 JNDI 属性Java 系统属性 (System.getProperties())
系统环境变量
RandomValuePropertySource 提供的随机值应用之外的 application-{profile}.properties、application.properties 和 YAML 文件
应用内部的 application-{profile}.properties、application.properties 和 YAML 文件
带 @Configuration 注解的配置类的 @PropertySource 注解
通过 SpringApplication.setDefaultProperties 指定的默认属性
@Value 注解 1 2 3 4 5 6 7 @Component public class MyBean { @Value("${com.nekolr.name}") private String name; }
绑定到 bean 一个一个绑定到对应属性比较麻烦,可以选择直接绑定到 bean 上。
1 2 3 com.nekolr.name =nekolr com.nekolr.address =nekolr.com
1 2 3 4 5 6 @ConfigurationProperties(prefix = "com.nekolr") public class ConfigBean { private String name; private String address; }
设置好配置类后,还需要将配置类添加到入口类上。
1 2 3 4 5 6 7 8 9 10 @SpringBootApplication @EnableConfigurationProperties({ConfigBean.class}) public class DemoApplication { public static void main (String[] args) { new SpringApplicationBuilder (DemoApplication.class) .bannerMode(Banner.Mode.OFF) .run(args); } }
最后,在需要用到配置类的地方,注入即可使用。
1 2 3 4 5 6 7 8 9 10 11 12 13 14 15 16 17 18 19 20 @SpringBootApplication @RestController @EnableConfigurationProperties({ConfigBean.class}) public class DemoApplication { @Resource private ConfigBean configBean; @RequestMapping("/") public String index () { return "this is index " + configBean.getName() + " " + configBean.getAddress(); } public static void main (String[] args) { new SpringApplicationBuilder (DemoApplication.class) .bannerMode(Banner.Mode.OFF) .run(args); } }
随机值 Spring Boot 的 RandomValuePropertySource 提供了一些随机值生成,方便开发使用。
1 2 3 4 5 6 secret =${random.value} number =${random.int} bignumber =${random.long} uuid =${random.uuid} number.less.than.ten =${random.int(10)} number.in.range =${random.int[1024,65536]}
参数引用 1 2 com.nekolr.name =nekolr com.nekolr.address =${com.nekolr.name}.com
自定义配置文件 可以不将配置放在 applcation.properties 文件,使用 PropertySource 指定自定义的配置文件。
1 2 3 4 5 6 7 8 @Configuration @ConfigurationProperties(prefix = "com.nekolr") @PropertySource("classpath:custom.properties") public class ConfigBean { private String name; private String address; }
Profile 多环境 我们知道,在开发时和应用上线运行时,应用具体的配置可能会有所不同,每次修改替换配置文件比较麻烦,此时可以使用 profile 多环境配置。
除了 application.properties 文件外,还可以设置特定的配置文件,文件的格式为:application-${profile}.properties,比如:application-dev.properties,在 application.properties 中设置 spring.profiles.active=dev 或者通过命令行 java -jar xxx.jar --spring.profiles.active=dev 来指定当前激活的是哪个特定的配置文件。
也可以使用 @Profile 注解来表明当前配置属于哪个 profile,然后在 application.properties 中设置当前激活哪个环境。
1 2 3 4 5 6 7 8 9 10 11 12 13 14 15 16 17 18 19 20 21 22 23 24 25 26 27 28 29 @PropertySource("classpath:db.properties") @Configuration public class DataSourceConfig { @Value("${db.user}") private String user; @Value("${db.password}") private String password; @Profile("test") @Bean("test") public DataSource testDataSource (@Value("${db.test.url}") String url) { DataSource dataSource = new ComboPooledDataSource (); dataSource.setUser(user); dataSource.setPassword(password); dataSource.setUrl(url); return dataSource; } @Profile("dev") @Bean("dev") public DataSource devDataSource (@Value("${db.dev.url}") String url) { DataSource dataSource = new ComboPooledDataSource (); dataSource.setUser(user); dataSource.setPassword(password); dataSource.setUrl(url); return dataSource; } }
参考
Spring Boot 常用配置汇总